Maker Price 3D

Introduction:
Recently, I became interested in the world of 3D printing. I have always found it fascinating to be able to bring almost any kind of model to life, whether tools, decorative items, or completely original ideas, limited only by creativity. Driven by this interest, I decided to buy a simple resin printer, and so far, I believe it was a great choice.
Today, there are several types of printers available on the market, with the most common being filament and resin printers. I chose a resin printer mainly because of the level of detail it can achieve, which is essential for small miniatures such as characters. This fits perfectly with my interest in action figures, even though I do not always have the budget to buy many of them.
I admit that in the beginning, it was more difficult than I expected. Watching videos online, everything looked almost “magical,” with perfect prints coming out and, after painting, turning into true works of art. In reality, however, the process is far from simple. I had to learn many new concepts, such as how to apply and configure supports, the ideal wall thickness, and even how to position holes correctly to prevent resin from accumulating during printing.
In summary, achieving good results requires a considerable level of technical knowledge, something I did not have at the time. Because of that, I sought help from more experienced people who had been working with 3D printing for longer and were even making money from it. Over time, I improved, adapted to the process, and enhanced the quality of my prints. Even so, I know there is still a lot of room for growth.
So where does Maker Price 3D come into this story?
After many conversations with professionals in the field and members of online communities, I noticed a recurring issue: there is no clear standard for pricing. Many people use 3D printing as an extra source of income, but often do not know exactly how much to charge for their products, and in some cases, they end up losing money without realizing it.
This does not happen due to a lack of skill, but because of how complex the topic is. It is very common to consider only material costs while ignoring important factors such as maintenance, equipment wear, electricity, working time, finishing, painting, and of course, profit. When all these elements are taken into account, it becomes clear that ignoring them can lead to significant losses. Even when there is profit, it is often consumed by hidden costs, such as parts that break or wear out over time.
Based on these discussions and my own practical experience, I gathered the most important factors that should be considered when pricing a custom product. From that, after many hours of work, I developed a simple yet highly useful software tool: essentially a complete calculator designed specifically to help makers determine the ideal price for their creations.
The goal of Maker Price 3D is not to impose rules or say what is right or wrong, but to provide a solid foundation for those who want to grow in this market and avoid losses. The tool takes the entire process into account, from printing to finishing and final delivery to the customer, bringing more clarity and confidence when setting prices.
Since the project is still in its early stages, there is plenty of room for improvements and new ideas in the future. Even so, what has already been developed is enough to help you avoid losses and make more informed decisions. So feel free to try the tool, it is completely free. 😊
Important Requirements!
► When running the program, Windows Defender may flag it as a "virus" or "Trojan" because it is a standalone application. However, the program is safe and will not perform any actions beyond its intended purpose. You can review the source code in my GitHub repository.
GitHub: https://github.com/cleitinhodev/makerprice3d
► Warning!!! Avoid downloading from untrusted sources. The user is fully responsible for any misuse of the tool.
Main Interface

I know, this large number of fields can be intimidating at first glance. It may look like a form or even a spreadsheet, and in a way, it is not too far from that. The difference is that everything was designed to be more intuitive and elegant, with formulas already set up, minimizing the need for manual calculations throughout the process.
It is important to note that having some basic knowledge of the topic is helpful. However, do not worry if you have just bought your printer and are still learning, this tutorial is also for you. In fact, beginners are exactly the audience that can benefit the most from this software.
The system was designed to follow a logical sequence, starting from the slicing stage of the STL model. From there, each step introduces new factors and highlights potential hidden costs, covering the entire process all the way to the final delivery to the customer.
In this tutorial, I will explain step by step what each field does, how the calculations are performed, and also show you where to find the information needed to fill everything out correctly.
Material

In this section, you will enter the values related to the amount of material used to print the piece that will be sold. The goal is to convert this consumption into an estimated monetary value.
To begin, you need to know how much you spent on a 1Kg bottle of resin, which is the most common unit sold on the market. This value can vary depending on the brand, supplier, and type of resin used, since not all resins are the same. The most important point here is to have a clear idea of the average cost you pay for this material.
The second essential value is the weight of the piece in grams (g). This information can be obtained directly from STL slicing software, as shown in the image below. These programs usually calculate this automatically and display it clearly, since it is an important parameter. Even so, it is always a good idea to check the settings and confirm which unit of measurement is being used.
Some software tools go further and even provide a cost estimate, but as mentioned earlier, this value only considers the material and ignores other important factors that also impact the final price.
With these two values, the system will automatically calculate the material cost based on the total price of 1Kg of resin.
The two additional fields are meant to cover information that may not have been included automatically. Although it is not very common, some slicing software does not include the material used for supports in the main calculation, which can lead to inaccurate results. To address this, a field was added where you can enter the estimated percentage of material used for supports.
There is also a fixed cost field, designed to account for small expenses that are not directly visible in the printing process. A good example would be resin loss during handling or cleaning the tank. Since resin is relatively expensive, it is important to account for even these small losses in the final calculation.
Now, a summary of each field in the Material section:
Resin 1Kg (R$): Amount paid for a 1Kg bottle of resin.
Piece Weight (g): Amount of material used in the print, in grams.
Supports (%): Estimated percentage of material used for supports. If your software already includes this, you do not need to fill it in.
Fixed Cost (R$): Additional value entered by the user to cover extra expenses.
Formula:
((weight / 1000) * resin) * (1 + supports / 100) + fixed cost

Energy Consumption

The Energy Consumption section is not complex in terms of its formula, as it essentially involves summing the energy usage of the main equipment used in the process.
Starting with the 3D printer itself, which, to my surprise, consumes less energy than I initially expected. However, over the course of a full month, this consumption can become significant. Another very common piece of equipment in resin 3D printing is the Wash & Cure machine, which is used to clean the printed parts by removing resin residue and curing them using UV light.
In addition, tools such as electric sanders or drills are often used to remove imperfections and leftover supports. Finally, there is the painting stage, which typically involves using an air compressor along with an airbrush.
All of these devices consume energy and should therefore be included in the final cost of the piece. After all, you are literally converting electricity into a product.
This brings up an important question: how do you accurately calculate the energy consumption of each device?

When you click the calculation button, a simple and intuitive calculator will open, designed to estimate energy consumption based on a standard formula. From there, you only need to fill in a few values, which are easy to find.
The first is the device’s power rating, measured in Watts (W). This information is usually printed on the device itself, often on the back, on the power supply, or in the manufacturer’s manual.
Next, you need to enter the average usage time per day, in minutes. This represents how long the device stays on each day. This is an important factor, since some equipment, such as 3D printers, can run for many hours continuously.
After that, enter the number of days per month that the device is used. If the usage is occasional, you can set this value to 1, representing a single day of use.
Finally, there is the kWh (kilowatt-hour) cost, which is where many people have questions. A kWh is the unit used by electricity providers to measure energy consumption. In simple terms, 1 kWh represents using 1000 Watts for 1 hour. For example, a 100W device running for 10 hours consumes exactly 1 kWh.
This value can be found on your electricity bill and represents how much you are charged per kWh consumed. It is essential for converting energy usage into monetary cost.
After entering all the values correctly, the calculator will display three results: energy consumption in kWh, monthly cost, and daily cost. In most cases, you should use the daily cost as the basis for pricing your product. However, if you are working with very long prints that take multiple days to complete, it may be more appropriate to consider the total cost for the entire duration.
One of the advantages of this calculator is that it can be used for any electrical device. Additionally, the “Total” field will automatically display the sum of all entered values. These costs are usually relatively low, so if you see an unusually high number, it is a good idea to review your inputs to make sure everything was entered correctly.
Wear and Tear

This is, without a doubt, one of the most overlooked aspects for those working with 3D printing, and also one of the biggest sources of unexpected costs over time. With continuous use, maintenance becomes inevitable: torn FEP, damaged screws, or in more severe cases, a faulty LCD. No equipment lasts forever, and the real problem is not the wear itself, but failing to prepare for it.
With that in mind, this section was created to estimate the average wear per print. The goal is to distribute these costs over time in a fair way, helping you avoid both losses and overpricing. After all, each print uses the printer’s components differently, and this needs to be taken into account.
Let’s go through what each field represents:
Starting with the LCD Price, you should enter the cost of a new LCD compatible with your printer. This value varies depending on the model and, generally, higher resolution screens are more expensive. The LCD is one of the most costly components that can fail, which makes it essential to include in the calculation.
Next, we have the Lifespan, which refers to the average operating time of the LCD in hours. This value is usually provided by the manufacturer and is typically around 2000 hours or more. Then, enter the Total Time of the current print, also in hours.
Even after filling in these fields, the total may still remain at zero. This is because the FEP wear has not yet been included. The FEP is the film located at the bottom of the resin tank. Unlike the LCD, it wears out more frequently, but it is significantly cheaper.
For the FEP, follow a similar approach: enter the cost of a new FEP and, in the durability field, provide the average number of uses before it needs to be replaced. This value comes with experience, but it usually does not exceed a few dozen uses.
Next, enter the percentage of the area used during the current print. This is important because not every print uses the entire build area, and the wear is proportional to usage.
Finally, there is an extra maintenance field where you can include additional costs, such as protective films, which are highly recommended to help preserve your equipment.
The idea behind this calculation is to account for the combined wear of the main components, since resin printing requires both the LCD and the FEP to be in good condition. In other words, both are being worn down simultaneously during the process.
Summary of fields:
LCD Price (R$): Cost of a new LCD.
Lifespan (h): Average lifespan of the LCD in hours (e.g., 2000).
Total Time (h): Duration of the current print in hours.
FEP Price (R$): Cost of a new FEP.
Durability (uses): Average number of times the FEP can be used before replacement.
Area (%): Percentage of the FEP area used in the current print.
Maintenance (Fixed/Extra): Additional value for extra costs.
Formula:
((LCD price / lifespan) * total time) + ((FEP price / durability) * (area percentage + 0.33)) + extra maintenance
Finishing

The finishing stage is often one of the most variable parts of the process, since not every piece requires the same steps or uses the same resources. Even so, three stages are extremely common in most prints: cleaning, sanding, and painting. For this reason, these three processes have been grouped into a single section, allowing you to estimate an average finishing cost in a practical way.
Starting with cleaning, this step can vary significantly, as each person may use different methods. However, the use of solvents is almost always necessary, which makes it important to estimate how much is being spent.
Isopropyl alcohol is the most commonly used solvent for removing resin residue. However, with repeated use, it gradually loses its effectiveness, making it harder to reuse. In the example, we consider a cost of around R$24 per liter. Next, you enter how many cleaning cycles can be performed with that amount, meaning how many pieces can be cleaned before the solvent loses efficiency. Finally, you input the total amount of solvent used to clean the current piece.
Each person may estimate this differently, but the key is that the value makes sense. For example, a 5-liter container costs around R$120, which results in approximately R$1.92 per print. The goal is to ensure that at least part of this cost is accounted for.
In the sanding stage, the logic is slightly different. When using tools such as drills or rotary tools, the abrasive tips wear out over time. Although cured resin is relatively easy to shape, continuous use will eventually consume these components.
In this section, you should enter the average cost of a new tip, its lifespan in number of uses, and how many tips are used during the finishing process. In most cases, this cost will be low, often just a few cents. However, depending on the type of resin or if other materials are involved, the wear may be greater and should be considered.
Finally, we have the painting stage, which is often one of the hardest to estimate accurately. Many people do not track how much paint they actually use, which can lead to unnoticed losses over time.
Here, you should enter the average cost of a unit of paint, the volume in milliliters per unit, and the amount of paint used for the current piece. Common acrylic paints, for example, usually cost around R$5 per unit, which can be used as a reference. Once these values are entered correctly, the system will calculate an average painting cost, which can be used as a minimum value to ensure this expense is not overlooked.
Summary of fields:
Solvent 1L (R$): Average cost of 1 liter of solvent.
Cleanings per 1L: Number of cleaning cycles before the solvent loses effectiveness.
Total Used (L): Amount of solvent used to clean the current piece.
Tip Cost (R$): Average cost of a sanding tip.
Lifespan (uses): Number of uses before the tip is fully worn out.
Tips Used (qty): Number of tips used in the finishing process.
Unit Cost (R$): Average cost of a paint unit.
ml per Unit: Average volume of paint per unit.
Average Usage (ml): Amount of paint used for the current piece.
Formulas:
(solvent cost / cleanings per liter) × liters used
(tip cost / lifespan) × tips used
(paint cost × average usage) / ml per unit
Expenses

The expenses section is where you can include specific costs that have not yet been accounted for in the previous steps. There is no fixed pattern or strict rules here, you have full freedom to add anything you consider relevant to the production process.
For example, items such as gloves, masks, and filters are quite common, since resin 3D printing requires personal protective equipment due to its potentially toxic nature. In addition, you can also include other elements such as separately purchased parts, specialized paints, varnish, or any other material used in finishing or assembling the final product.
The possibilities are broad, and this section exists to ensure that no important cost is overlooked.
You can add, edit, or remove items from the list as needed. All values will be calculated automatically at the end, based on the quantities provided. The most important thing here is to make sure everything you used is properly accounted for.
Logistics
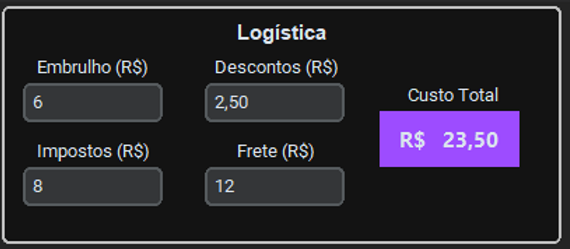
In the logistics stage, we once again work with the sum of multiple costs, this time related to delivering the product to the customer.
Here, you will gather the most common expenses for this phase, starting with packaging. This includes items such as boxes, protective plastics, foam, and any materials used to ensure the piece arrives safely at its destination.
Next, we have taxes, which may vary depending on the region or type of shipment. This field is especially important for international deliveries or situations where additional fees may apply.
Shipping costs must also be considered, particularly for long-distance deliveries, where they can significantly impact the final price.
Finally, there is the discount field, which works differently from the others. Instead of adding to the total, it is subtracted, representing promotions or price adjustments. This allows you to apply discounts in an organized way without losing track of the actual costs.
Labor

Labor is often one of the most overlooked costs in 3D printing, and at the same time, one of the most important. Time has value, and every hour invested in producing a piece should be taken into account.
Tasks such as setup, cleaning, sanding, and painting all require time and effort. During this process, you are not actually making a profit yet, you are simply converting your time into production. That is why it is essential to properly include this factor in your calculations.
The calculation itself is simple: multiply your desired hourly rate by the total number of hours spent working on the piece.
This value can vary depending on each person’s situation and goals, but one key point remains: do not undervalue your work. Ideally, you should aim for an hourly rate similar to what you would earn in a regular job, since 3D printing, beyond being a hobby, is also a professional activity.
Total and Profit

Finally, we reach the last stage of the calculation process. This is where you define your actual earnings on the piece, in other words, your profit.
It is very common to confuse labor cost with profit, but they are not the same, and understanding this difference is essential for the growth of your business.
Before the final total, there is a slider that allows you to set your profit margin, ranging from 0% to 100%. At this point, each professional defines their own value based on their situation. It is common for beginners to start with lower margins to attract customers, gradually increasing their prices as they gain experience and recognition.
Maker Price 3D is not designed to determine the “correct” profit margin, since this depends on many individual factors. Instead, its purpose is to provide a solid foundation and practical guidance, leaving the final decision to the person who truly understands the value of their work.
After filling in all the fields, even if some are left blank, the system will update the total one last time. At this stage, it will clearly separate the total production cost from the applied profit, and display the final price as the sum of both.
Finally, you will have the option to save all the information in a .JSON file, so you do not need to fill everything out again whenever you want to recalculate or adjust the values.
Final Considerations
I can confidently say that 3D printing was love at first sight. I plan to keep learning, improving, and developing solutions that can help others who face the same challenges I did.
Maker Price 3D helped me see this process in a much more strategic way, giving me a clearer understanding of how to price products properly, sell more effectively, and avoid hidden losses throughout production. In the future, I plan to release new updates and expand its features, including support for filament printers and more improvements.
For now, I would like to thank everyone who supported the project and shared their feedback.
See you in the next updates.
Until next time! :)